
This article was adapted by Susan Martin Maffei and Mary Lane from Archie Brennan’s original instructions. Drawings by Archie Brennan. Photos and video: Susan Martin Maffei.
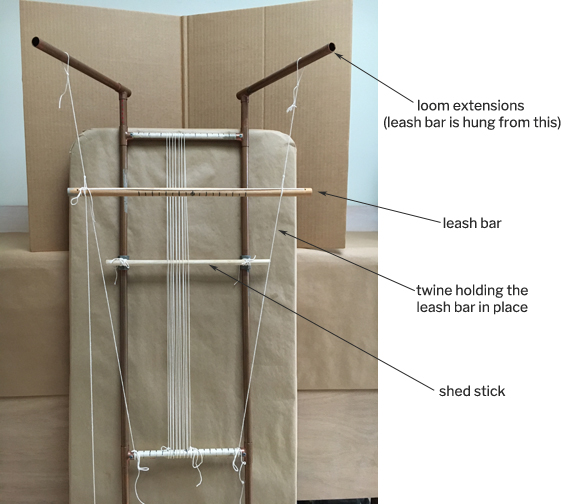
- Hang a leash bar approximately chest high from loom extensions at the top of the loom. (See Figures 1 & 2) The leash bar should be the full width of the loom or a little wider. Use a dowel or tube depending on the loom width. (See Figure 1) Fix the leash bar in place by tying a length of twine to the top loom extension, wrapping it around the leash bar and then tying it to the bottom of the loom. Do this on both sides and tie the cords tight, so that the leash bar cannot move. The leash bar should be parallel to the top of the loom.
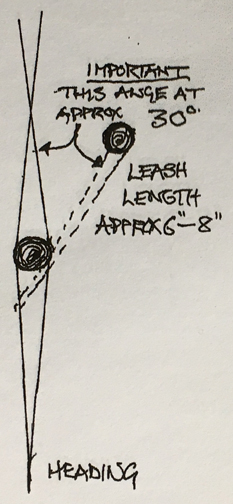
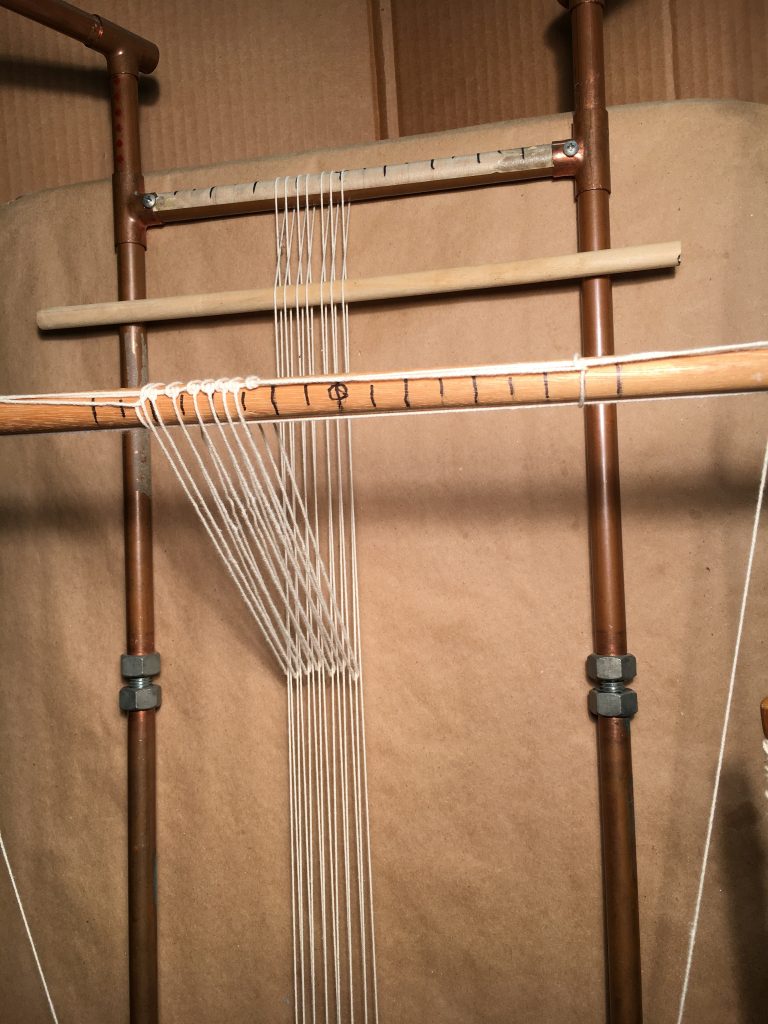
2. Insert a shed stick through the warp to establish a fixed open shed. (See Figure 1) Align the shed stick below and parallel to the leash bar, so that a line drawn between them makes approximately a 30 degree angle with the warp. (See Figure 3) The leashes operate best at this angle. Secure the shed stick so that it will not slide up nor down.
Figure 3
In Figure 1 the shed stick is tied to the nuts that are part of the threaded tensioning rod. If tying the shed stick to the nuts does not create the angle described in Figure 3, you can secure the shed stick in the correct spot by tying it to the top and bottom of the loom, in a manner similar to the way the leash bar was secured in place. Remember to tie the shed stick very tightly so that it cannot move when the heddles are made. It is important that leashes are the same length, and an immovable leash bar and shed stick are what maintain a uniform length.

3. Along the length of the leash bar attach a leash cord, tied tightly to each end. Use cotton warp for this. In Figure 4 the leash cord is run through holes in the leash bar. It can also be attached by notching the ends of the leash bar. In this case tie a knot in the end of the leash cord. This will keep the thread from slipping out when you fix it into the notch. The leash cord stretches along the leash bar, is pulled through the notch on the other side and then returns to the beginning where it can be run through the notch again and then tied off to itself on the top of the leash bar. The leash cord should be quite tight.
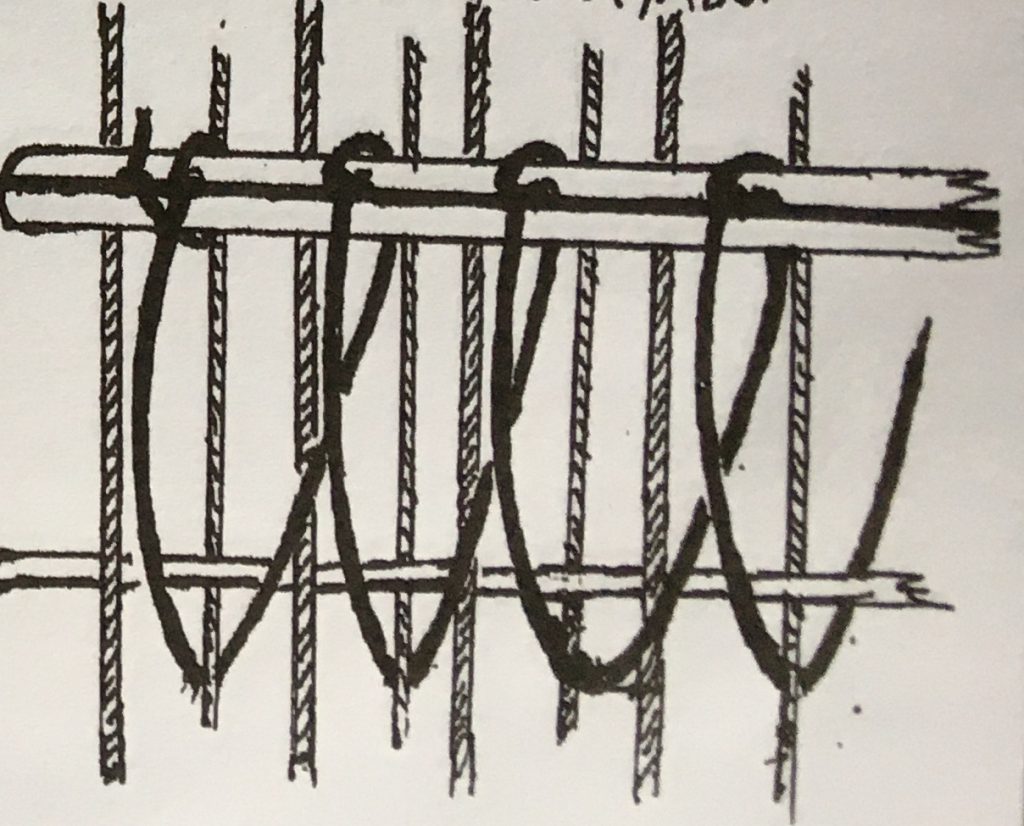
4. Leashes are a continuous loop starting at the leash bar, encircling a warp behind the shed stick and returning to the leash bar where it is secured with two half hitches. (See Figure 5)
5. Use the same cotton warp for the leashes. Wind a bobbin full with warp and tie the end securely around the leash cord, in line with the first warp on the left. To secure the leash cord firmly against the leash bar, wrap the warp tightly around the leash bar and the leash cord and add two half hitches around just the leash cord.
6. If the farthest warp to the left is above the shed rod proceed as follows: Starting on the left side of the warp, with your left hand below the level of the shed rod, push the first open (top) warp to the left, then pull the first closed (back) warp towards you, clear of the other warps. Pass the bobbin of warp under the leash bar and left to right around the (back) warp, then back to the leash bar over the top of it.
If the farthest warp to the left is below the shed rod proceed as follows: Starting on the left side of the warp, pull the first closed (back) warp towards you, clear of the other warps. Pass the bobbin of warp under the leash bar and left to right around the (back) warp, then back to the leash bar over the top of it.
7. Pull the slack of the warp over the leash bar and down across the leash cord. Add two half hitches around the leash cord to secure the leash in place. Then pass the bobbin under the leash bar again to make the next leash. Maintain an even tension as you create the leashes so that the leashes are all the same length.
Notes:
- This is a strict pattern that is important to follow when making leashes because it is a disaster if you jump over or under two warps instead of one warp. You then must restart.
- The half hitches along the leash cord establish the spacing of the leashes. Each leash should drop straight down to the warp it is encircling. Use more or less half hitches around the leash cord in order to establish the correct spacing of the leashes.
- If you need to add a new bobbin of warp to complete the leashes, tie off the old bobbin and tie on the new bobbin at the leash bar so that the knots do not tangle with the warp, or with the leashes.
8. To keep the leashes from sagging, wrap the warp tightly around the leash bar (and the leash cord) approximately every 12 inches. Secure that wrap with two half hitches on the leash cord.
9. After all the leashes have been made, finish the way you started by wrapping the warp tightly around the leash bar (and the leash cord). Secure that with two half hitches on the leash cord.
Figure 6
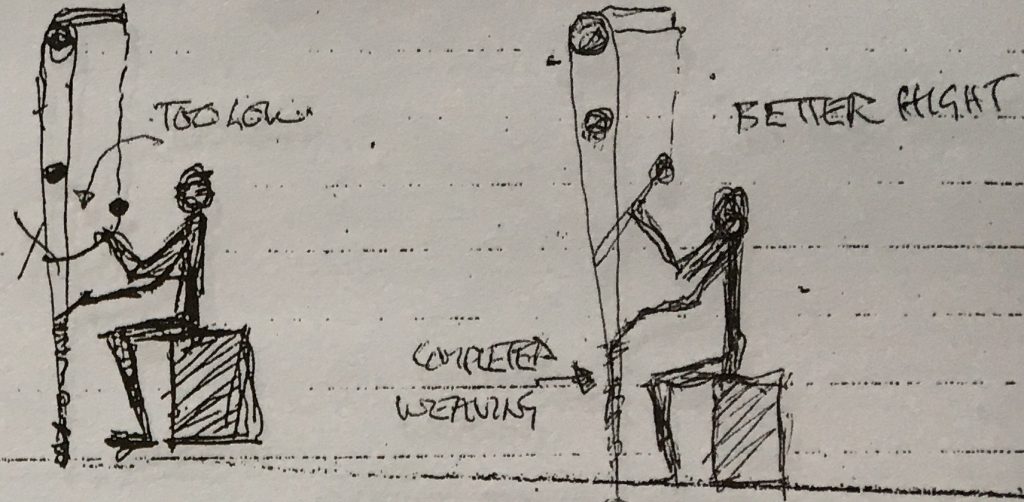
10. When the leashes are completed, adjust the height of the leash bar so that the leashes are easy to reach. (See Figure 2)
11. Adjust the shed stick upwards to allow free movement of the leashes, yet maintain a workable open shed. (See Figure 6)